

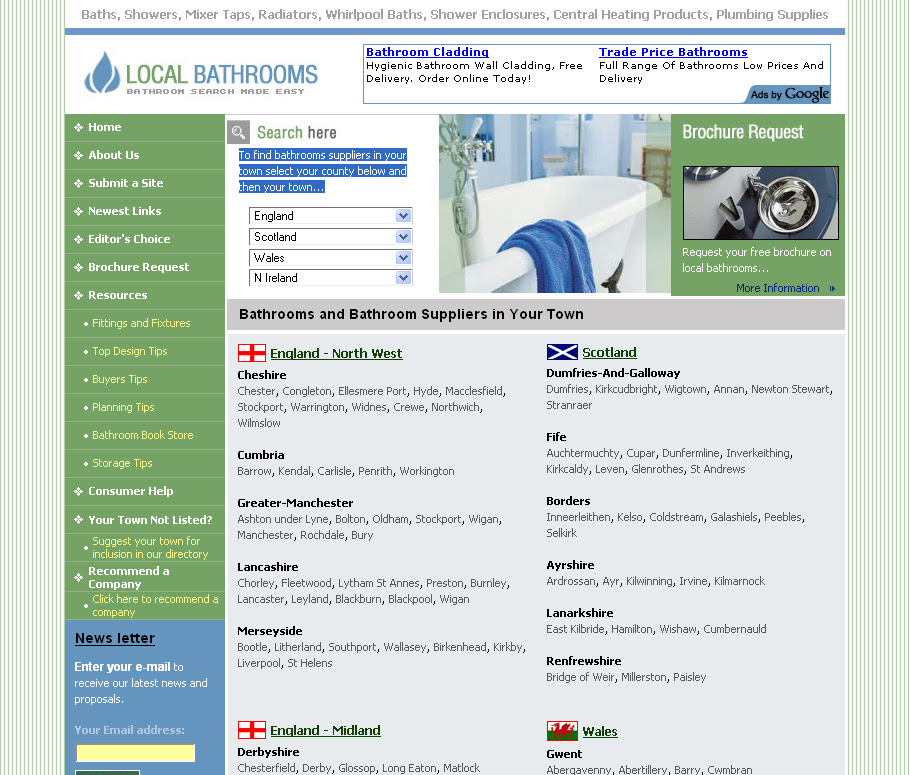
In this dreamweaver tutorial we will be creating this:
You should now see this, here we will insert the options for our table.

Once we have created the table, we will go to the bottom of our Dreamweaver and look at the table properties. We are going to center the table on the page, to do this we will click Align > Center.

Now if you click of the table you will see a button at the bottom of Dreamweaver named Page Properties, here we can see the page font, size, colour and background colour.
We have set these options, instead of choosing and page background colour we have chosen to have a image as our background.

In the top row of the table, we are going to type in our keywords which will help the search engines know what our website is about, we are going to center the text and bold it.

In the second row we are going to insert out website logo, to insert a image go to Insert > Image
Find your image and click ok. Now click on the image and we are going to make a horizontal space of 20 pixels so it indented from the size of the table. We are also going to link the logo to our homepage so it will be easier for our visitors to navigate there way back to the home, do this by typing in your home page url in the link form. You use Index.html (.htm or .php can also be used) so the browser will see this page first if they type in our domain.

We are now going to click inside the second row and give a height of 70 pixels, seen bellow:

You should now have this:

Now in the third row right click and go Table > Split Cell…

Split the cell into 2 columns and click OK.

Click inside the left column and give it a grey background and a width of 170 pixels.

Now insert a table inside the left column (Insert>Table) using these options:

Click in the top row of the new table and drag down to the bottom table so it highlights all of the tables. We will now give the tables a height of 21 pixels and a background colour of green.

You should now be left with this:

For our first 7 links we are just going to put text with a small image.
For the next links we are going to, bullet point, resize to 11 pixels, and give a colour of yellow.

You should now have this:

Now once we have completed our links we are going to preper our news letter sign up, something every site should have. For my website’s i use a News Letter Software offered by Aweber.com but for the sake of this tutorial we will design the news letter.
Go and click on the Text Field image in the Forms panel or go Insert>Forms>Text Field.
You should now have a text field:
We are going to do this twice the followed by a submit button, Insert>Forms>Button or through the Forms Panel by clicking Button.

You should now of created a form like this:
Name:
Email:
Now in the right column in the third row we are going to insert another table (Insert>Table)

In our left column of our new table, we are going to add a List Menu, this allows visitors to scrole through a list of pages to find the link there looking for.

The item label is what you want your visitors to see in the list and value is where you want the item to take them. Click ok when finished.

I then added content to the other 2 columns using a couple simple images and text, you should now have this:

Now we are going to make our Links, highlight the text you want to link to a page and go to the bottom to properties and just like when we linked the logo we are going to link to the page we want.

You will noticed the text changed the blue and underlined
To change the appearance of our links, go to Page Properties and click Links.
I have chosen to have the link as white but on link over to be yellow. We have also chosen never to underline our links.

Adding adsense to our layout is simple, right click where you want to insert adsense (next to our logo in the header for us) and click Insert HTML…
Paste your adsense code and your done.

Finally we are going to go give our web page its page title which helps search engines to find out what out website is about.

After inserting our page content you should be left with this:
Website Url: http://www.local-bathrooms.co.uk/
To build our website we will be using tables, to create tables we will go Insert > TableYou should now see this, here we will insert the options for our table.
Once we have created the table, we will go to the bottom of our Dreamweaver and look at the table properties. We are going to center the table on the page, to do this we will click Align > Center.
Now if you click of the table you will see a button at the bottom of Dreamweaver named Page Properties, here we can see the page font, size, colour and background colour.
We have set these options, instead of choosing and page background colour we have chosen to have a image as our background.
In the top row of the table, we are going to type in our keywords which will help the search engines know what our website is about, we are going to center the text and bold it.
In the second row we are going to insert out website logo, to insert a image go to Insert > Image
Find your image and click ok. Now click on the image and we are going to make a horizontal space of 20 pixels so it indented from the size of the table. We are also going to link the logo to our homepage so it will be easier for our visitors to navigate there way back to the home, do this by typing in your home page url in the link form. You use Index.html (.htm or .php can also be used) so the browser will see this page first if they type in our domain.
We are now going to click inside the second row and give a height of 70 pixels, seen bellow:
You should now have this:
Now in the third row right click and go Table > Split Cell…
Split the cell into 2 columns and click OK.
Click inside the left column and give it a grey background and a width of 170 pixels.
Now insert a table inside the left column (Insert>Table) using these options:
Click in the top row of the new table and drag down to the bottom table so it highlights all of the tables. We will now give the tables a height of 21 pixels and a background colour of green.
You should now be left with this:
For our first 7 links we are just going to put text with a small image.
For the next links we are going to, bullet point, resize to 11 pixels, and give a colour of yellow.
You should now have this:
Now once we have completed our links we are going to preper our news letter sign up, something every site should have. For my website’s i use a News Letter Software offered by Aweber.com but for the sake of this tutorial we will design the news letter.
Go and click on the Text Field image in the Forms panel or go Insert>Forms>Text Field.
You should now have a text field:
We are going to do this twice the followed by a submit button, Insert>Forms>Button or through the Forms Panel by clicking Button.
You should now of created a form like this:
Name:
Email:
Now in the right column in the third row we are going to insert another table (Insert>Table)
In our left column of our new table, we are going to add a List Menu, this allows visitors to scrole through a list of pages to find the link there looking for.
The item label is what you want your visitors to see in the list and value is where you want the item to take them. Click ok when finished.
I then added content to the other 2 columns using a couple simple images and text, you should now have this:
Now we are going to make our Links, highlight the text you want to link to a page and go to the bottom to properties and just like when we linked the logo we are going to link to the page we want.
You will noticed the text changed the blue and underlined
To change the appearance of our links, go to Page Properties and click Links.
I have chosen to have the link as white but on link over to be yellow. We have also chosen never to underline our links.
Adding adsense to our layout is simple, right click where you want to insert adsense (next to our logo in the header for us) and click Insert HTML…
Paste your adsense code and your done.
Finally we are going to go give our web page its page title which helps search engines to find out what out website is about.
After inserting our page content you should be left with this: